
Salted Chocolate and Coconut Popcorn

Valentine's Day is coming!! Are you ready? Are you going out with your sweetie or staying in? Are you doing a family Valentine's dinner? Both?? We are doing both. I'm doing a Valentine's Day "I Love You" Dinner for my husband and two girls and I. One thing that is big on Valentine's day is chocolate, but when you are trying to watch what you eat, it quickly get out of hand.

Dark chocolate is a healthier alternative and is even encourage (in small amounts) on a low-carb diet.


So, I created this popcorn recipe using dark chocolate and coconut. It is a delicious snack or a special, light treat.


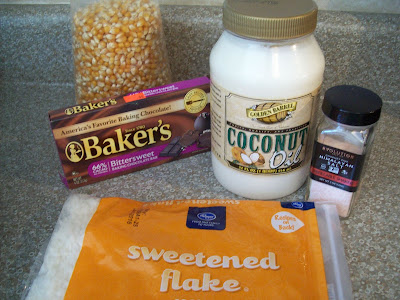
The ingredients are simple. Coconut oil (you could use butter), Salt, Bittersweet or other dark chocolate, popcorn kernels and coconut flakes.

I did not measure anything when I made it, but I will try to give some approximate amounts.
Salted Chocolate and Coconut Popcorn
  • 1 TBSP Coconut oil
  • 1/4 cup popcorn kernels
  • 1 oz dark chocolate
  • 1/2 tsp coconut oil
  • dash of salt (I used Pink Himalayan Salt, but you could use sea salt)
  • 1 TBSP coconut

In a large pot with a lid, place 1 TBSP coconut oil, dash of salt and popcorn kernels and cover. Cook on the stove on medium heat, shaking constantly until all kernels are popped.  Remove kernels from pot and spread on cookie sheet. 

In a microwavable bowl, place dark chocolate and 1/2 tsp coconut oil and microwave in 30 second intervals until fully melted.

Drizzle melted chocolate over popcorn. 

Place coconut on microwavable plate and heat for 10-15 seconds. You just want it to crisp up a little bit. You could also toast these in a skillet or the oven.
Sprinkle coconut over popcorn. Let chocolate harden and devour happily.

Edit: I tasted mine right and thought it needed a little more "sweet" so I just used a pinch of sugar substitute and sprinkled it over top. 


Comments

Popular posts from this blog

My $100 Kitchen Cabinet Makeover!

I'm so excited to share today's post. It's something I've been working on for about 2 months, on and off. But it is finished and so today I'm sharing how we renovated our kitchen cabinets for about $100. When we bought our house in a little over a year ago, I fell in love with the kitchen just by the listings photos. UPDATE!!! Check out this  post to see how I also stained my island! It was HUGE and there was about a billion cabinets. The kitchen in our old house was a pretty good size also and I knew I would not be content with a smaller kitchen. So these pictures sold me. We bought the house and moved in and I lived with the kitchen for awhile but the cabinet color was really bugging me. I liked the counter tops well enough but they clashed with the cabinets. We did not have the money to replace all those cabinets so the next decision was to either paint or stain them. I stumbled upon General Finishes Gel Stain and thought the id...

$5 Laundry "Room" Update

I don't have a laundry room. I have a laundry closet right off the kitchen. I actually love it there because it is so convenient to keep laundry going through out the day. I wish it was a little bigger and I have future plans down the road, but for now I have to keep it organized or there is just not enough room for it all! Here was the state of my closet before. Not too bad, but there were things in there that shouldn't be in there (a sprinkler??) and it just was cluttered. Not to mention plain and boring. I think I've mentioned before on here how much I love Dollar Tree. If not, I'll say it now. I love Dollar Tree! They have some of the cutest stuff! So I went there today to find some things to organize this with. Here's what I came up with. I bought the 3 aqua colored baskets today and the green and gray tray I was already using.  I wiped everything down and got to work. This is what it looks like now. The two hanging ...

Thrifty Thursday-Marked Down Bread

Today I am sharing a tip that I use to stretch my meals out a little.  I buy marked down Italian bread loaves in the store bakeries.  I bought this loaf for $.72. It was only $1.00 to begin with but $0.28 is $0.28! Plus that's not the only savings you get with this. I love those boxes of frozen garlic toast that are about $3.00 for 6 slices!!! That's crazy. But sometimes, I just really want some bread with my meal. So I slice up the loaf and portion it out in 4 pieces per bag.  I then put all the individual bags in one big freezer bag and freeze. When it's time to eat, just pull out a bag. They thaw quickly. I spread softened butter on each side and sprinkle with garlic salt. I sprinkle with mozzarella cheese and sometimes I add Parmesan cheese. Bake at 375 for about 7 minutes or until they reach the desired crispness. With those other boxes coming in at about $0.50/slice, these are so much cheaper!!